Too Much Turkey?

On the 1st day of Christmas….

Too much turkey…?’

Christmas is a glorious time of overindulging, over-feasting and overbuying. It’s the perfect time for me, with an overstocked fridge, to fully get into festive recipe invention mode. So, over the 12 days of Christmas I’ll be sharing some of my favourite Yuletide leftover recipes with you to help you clear out the fridges and recuse your Christmas food waste.

The Food Waste Diaries

This is only the second Christmas where I’ve been in charge of the shopping and the cooking and the first time it’s at my house. I’m really keen to make it extra special but  I also want to make sure that no food gets wasted.

To make things more difficult, it’s only a small gathering of three people but I still want a full turkey with all the trimmings. I couldn’t bring myself to resort to a turkey crown which would be much more suitable for a small gathering, it just wouldn’t be Christmas for me without a big bird stuffed on the table.

The smallest turkey I could find says it serves 6-8, and even with my gluttonous family, we won’t manage to scoff all 5kg down in one sitting, so it’s a good job that one of my favourite things about Christmas is the turkey left-over concoctions. I…

View original post 591 more words

Harissa baked cod with lemon cous cous

I’ve recently done a ‘stock take’ of all the less perishable ingredients lurking in my kitchen, these items don’t tend to be as much of a priority to use up as the perishables from my fridge, but never the less they build up over time and can become forgotten about until it’s too late and the use by date has approached.

The worst offending culprits for being forgotten about in my experience tend to be condiments and other items that come in jars. I often buy such ingredients, as I’m sure may of us do, for a particular recipe that only requires a miniscule amount of the total jar. TV cooking shows have a lot to answer for; introducing us all to new and exciting recipes that call for unusual and exotic ingredients that outside of the recipe they’re demonstrating are difficult to use up in every day cooking.

Harissa was one such offending item that I had left in my fridge, I wanted to use it for a quick and simple supper, however all the recipes I could find were complicated and called for a multitude of other ingredients, that if I was to purchase would contribute to another load of half-used jars in my fridge.

So I decided to ignore any complicated recipes that I had come across and create my own simple and flavoursome Middle Eastern inspired dish.

INGREDIENTS

For the fish:

  • 3 x tbsps natural yoghurt
  • 1 tbsp harissa paste
  • Juice of 1 lemon
  • 2 x cod fillets

For the couscous:

  • 100g couscous
  • 150ml boiling water
  •  1 x garlic clove crushed
  • 1 tbsp olive oil
  • Zest and juice of half a lemon

For the roasted vegetables:

  • 1 x red pepper cut into chunks
  • 1 x yellow pepper cut into chunks
  • 1 x onion chopped
  • Olive oil

METHOD

Mix together the yoghurt, harissa and half of the lemon juice, cover fish and leave in the fridge to marinate for 30 mins

Meanwhile, preheat the oven to 200c

Place the chopped veg in an oven proof dish, drizzle with olive oil and place in oven for 20 mins

20140706-180138.jpgWhilst the vegetables are cooking ,mix together all the ingredients for the couscous and leave to stand for 5 mins (or as per packet instructions)

Remove the roasted veg from the oven, mix with the couscous and transfer to an oven proof dish

Place the harissa coated fish, skin side up on top of couscous and vegetable mix and pour over the remaining lemon juice

20140706-180131.jpgBake in oven for 15-20 mins or until fish is cooked

This is a fantastic way to use up left-over harissa paste, the simple mix of yoghurt and harissa can be used to marinate a whole host of fish, poultry or meat which will ensure a jar is never left to fester in the back of my fridge again.


20140706-180123.jpg

Dips Away

In my last post I made a Tzatziki in which I substituted the traditional Greek yoghurt with Crème Fraiche, I also commented on how I much prefer to prepare my own dips as opposed to purchasing ready-made shop ones.

The main reason for this preference is that homemade dips are a great way of using up leftover ingredients; in particular yoghurt, cream, citrus fruits & fresh herbs. Dips don’t have to follow a set recipe every-time and you can experiment with different concoctions until the results suit your palate.

I thought I’d take this opportunity to show how your own fair hands can quickly and easily prepare some of the most common dips.

SOUR CREAM

Possibly the easiest of all dips to make; simply take some cream (or crème fraiche if you’re trying to be a bit healthier) and sour it by stirring in a squeeze of lemon or lime juice.

SALSA

The base of Salsa is obviously tomato and you can create your own by using any type of tomato you like; tinned, cherry or plum tomatoes all work great and will each individually create salsas that differ in both sweetness and texture. To form the base of any salsa, mix together chopped tomatoes, garlic and onion. From here you can add a whole host of ingredients to suit your taste, the most common additions are chilli for a bit of a kick, a squeeze of lime which adds a bit of zest or herbs such as coriander or parsley, depending on your taste. I have even heard of salsas being made with all kinds of crazy ingredients including chocolate and almonds, although I’m yet to try either of these creations.

GUACAMOLE

What could be more simple than mashed avocado mixed up with a bit of lemon juice? This is a great accompaniment to Mexican dishes such as chilli or enchiladas and is the perfect use for avocados that are verging on over-ripe.

TZATZIKI

See my previous post but essentially, yoghurt, garlic, cucumber and lemon

PESTO

A fantastic way of using up fresh basil, simply toast some pine nuts and blend with basil, oil & Parmesan. This is more than just a dip and can be used as a delicious homemade sauce for many recipes. As an example, have a look at my recipe for Grilled Halloumi & Cherry Tomatoes with Mint Pesto.

HUMMUS

Now I must confess that this isn’t one I’ve tried myself but I believe it’s as simple as blending some tinned or dried cooked chickpeas, lemon, garlic and a sprinkle of paprika.

I purposely haven’t published detailed recipes for these dips, purely because you really can start producing your own  creations on a trial and error basis, why not have a look at ingredients you have left to use up and start inventing? I’ve always managed to come out with something tasty (or at least edible) when I’ve attempted a dip. I hope that the above ideas inspire you to create your own dips, they’ll be sure to impress friends at a dinner party or summer BBQ, and of course you’ll be reducing food waste by using up those leftover items you might have lying around.

Cheat’s Tzatziki

There are a few items that I used to buy straight from the supermarket without questioning how they were made and what they contained, particularly sauces and dips.

In all honesty, I never really started cooking anything adventurous until my mid twenties, if I could buy an item in a bottle or jar, then I would, and it probably wasn’t until I moved to London and in with my partner that I became slightly more creative as I began to cook for two as opposed to just myself.

I think I initially discovered how simple Tzatziki was to make when the supermarket had ran out in advance of me entertaining a group of friends, rather than going without one of my favourite dips I decided to make it myself, and ever since that evening it’s now very rare that I purchase any pre-made sauces. One of the main benefits of this is that I find portion sizes of sauces and dips sold in supermarkets are often too large for the serving required; by making your own, you can make just the amount you need.

Now this recipe is entitled Cheat’s Tzatziki and that’s because I’ve replaced one of the core ingredients; yoghurt, with crème fraiche. The reason for this was purely that I had a half a tub of crème fraiche to use up, and in keeping with my mantra of food waste, I’m never afraid to experiment and substitute key ingredients when I have an item to use up.

Crème Fraiche generally has a runnier consistency and a more sour taste than yoghurt which will be the main taste difference you’ll find if you do choose to substitute yoghurt with it. If you prefer to stick with tradition and use yoghurt, than the recipe below remains the same.

INGREDIENTS

  • 150 ml Crème Fraiche
  • 1/2 cucumber
  • Juice of 1/2 a lemon
  • 2 x garlic cloves crushed
  • Fresh pepper

METHOD

Mix together the crème fraiche and lemon juice

 Peel the cucumber and grate

Squeeze the excess water out of the grated cucumber (I just use my hands, but I believe the professional way to do this is by wrapping in a clean tea towel and squeezing)

Mix the grated cucumber and crushed garlic into the crème fraiche and lemon mix

Season to taste

And that’s how to make a super simple cheat’s tzatziki, delicious as a dip for nibbles or crudités or a delicious condiment with Greek dishes such as Pork Gyros.


Bean Sprout & Coriander ‘Kimchee’

So, this isn’t technically a Kimchee, but it’s where the foundations of this recipe came from. Bean sprouts are one of the items that supermarkets simply don’t sell in small portion sizes, they also perish very quickly and the lack of a desire to eat stir-fry 5 nights in a row, forced me to come up with some other options for the short-lived bean sprout.

I found this Recipe, on the excellent blog Beyond Kimchee, a blog dedicated to Korean food, and as this was my first foray into a Kimchee creation, what better place to start?

Now I didn’t have all the ingredients to follow this recipe, but below is an example of how recipes can be used as a base and adapted to cater for items you do have in stock:

INGREDIENTS

  • 4 x Shallots
  • 2 x Garlic Cloves
  • 2cm piece of ginger
  • Handful of coriander
  • 300g bean sprouts
  • 2 tsps chilli flakes
  • 1 tbsp fish sauce
  • 1/2 tbsp rice wine vinegar
  • Pinch salt
  • 1 tsp sugar
  • 1 tsp sesame oil
  • 1 tbsp sesame seeds
  • Squeeze lime

METHOD

Steam bean sprouts for 4 minutes

Toast sesame seeds in a dry frying pan for 2 mins, until they start to ‘pop’

Allow hot ingredients to cool

Chop all other ingredients and combine in a bowl

Once cool, add the bean sprouts and toasted sesame seeds

Eat immediately or allow to marinate and ferment in the fridge over night

TIPS

Some more specialized ingredients may be hard to find in supermarkets, it’s always worth searching online for cheaper, more readily available substitutes

Fish Sauce, sesame oil and vinegar (rice wine or white wine) are what I consider to be cupboard staples if you’re a fan of Asian cooking as they form the base of many Asian sauces and dressings

The bean sprout kimchee is a great accompaniment for many meat/fish dishes, particularly salmon for which I have a complimentary recipe for Sweet chilli salmon here.

20140603-215954.jpg

Bacon, Pea & Ricotta Linguine

Firstly, I must apologise for the super large time lapse since my last post, it’s been an incredibly busy few months.

My busy schedule plus lack of a regular weekly routine means that quick, easy & healthy home cooked meals are a necessity to ensure that I steer clear of the ready meal aisle in the supermarket.

The bonus of this though is that sometimes the simplest of suppers are the most satisfying and this recipe in particular uses only 4 ingredients and takes less than 15 minutes to cook.

I often buy soft cheese such as Philadelphia for bagels and regularly struggle to use it all up before it starts to go off. Mixing soft cheeses into pasta dishes is a quick and hassle free way of making a tasty cheese sauce, in fact the versatility of soft cheeses constantly amazes me. You don’t have to stop at a pasta sauce, a quick dollop of Philadelphia can make a baked salmon or chicken fillet into something slightly more special, and I’m still regularly surprised every time I have to add a spoonful of cream cheese to a sweet recipe such as a carrot cake or biscuit filling. I also wouldn’t stop at cream cheese; pasta sauces can be made with an abundance of other soft cheeses such as ricotta as demonstrated here.

With all these ideas, there’s no excuse for allowing that tub of soft cheese to develop a layer of mould in the fridge, and here is just one an example of a super speedy supper recipe that was made using of some leftover ricotta cheese, a few rashers of bacon and what I consider to be a staple freezer ingredient – frozen peas.

INGREDIENTS

  • 1 tbsp Olive Oil
  • 400g Bacon (Diced)
  • 200g Frozen Peas
  • 400g Linguine
  • 150g Ricotta Cheese

METHOD

Cook Linguine according to packet instructions

Meanwhile fry the bacon for 4 minutes or until browned

Add the frozen peas and cook for a further 4 minutes

20140603-210504.jpgDrain the pasta, return to the pan and add in the cooked bacon and peas (include all the pan juices for extra flavour)

Stir in the cheese, heat for 2-3 minutes, or until sauce is warm and fully mixed

Season to taste and stir

And there you have it, dinner for 4 in less thank 15 minutes.


Cheese, Onion & Potato Pasties

I’d managed to overbuy some potatoes for this weeks meals, and having already peeled & diced the potato, I wasn’t quite sure what I could do with the leftovers.  It turns out that potatoes can be frozen, providing that they are blanched first to prevent them from turning black.  To blanch potatoes, you simply immerse in boiling water for about 4 minutes before quickly transferring into a bowl of iced cold water until cooled (about 10 minutes).  Once cool, dry the potatoes using kitchen roll or a tea towel and transfer to freezer bags before placing in the freezer to be used at a later date.

As well as the potatoes, I also had a packet of puff pastry left over from a family party where I’d used it for canapés, and as a Northerner born and bred, I love a good pasty, I already had some cheddar cheese in the fridge so Cheese, onion & potato pasty was the obvious choice for me.

 Whilst I could have just gone ahead and made Cheddar cheese & onion pasties, I love the bitterness of white crumbly cheeses, such as Lancashire & Wensleydale, so I decided to use a mix of Cheddar & Lancashire cheese in my pasties, but any cheese you have to hand will do.

As a side note, ready made puff pastry is one of my favourite time saving ingredients, you can do so much with it; canapés, pies, a twist on a pizza etc. and the results always look really impressive, when in reality, you haven’t had to try that hard, as you’ll see from the following recipe.

20140413-202229.jpgINGREDIENTS

  • Knob butter
  • 1 small onion, finely sliced
  • 1 small potato, cubed
  • 375g packet of puff pasty
  • 75g cheddar cheese
  • 75g white crumbly cheese

Serves 4

METHOD

Preheat oven to 180c

In a large saucepan, melt the butter over gentle heat

Add the onions and potatoes and sweat over a low heat with the lid on for 20 minutes, stirring occasionally

Season well with crushed black pepper (I tend to avoid adding salt as it should get this from the cheese & butter)

Mix in the grated cheese and allow to cool otherwise the heat from the mixture will make the pastry difficult to work with

Whilst the potato & onions are cooling, cut the pastry into 4 circles approx. 6cm diameter (I use a bowl to measure). You’ll find that you will need to reroll the in order to get all 4 circles

20140413-202157.jpg

Add about a quarter of the mixture to one half of each pastry circle; leave about 1/2 cm gap between the mixture and the edge of the pastry. Don’t overfill the circles with mixture or you’ll find it difficult to close your pasty.

Fold each circle in half and press the edges together with fingers or a fork, cut a couple of small incisions in the top of each pasty

20140413-202218.jpg

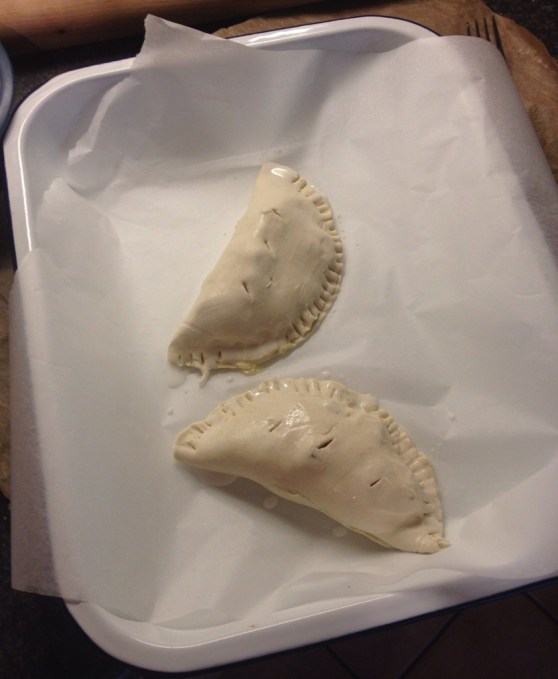
Brush the pasties with egg and place in oven for 15-20 minutes until golden brown

TIPS

Egg works best for glazing the pasties, as it will give nice golden colour but you can use milk if you’d prefer (which I did in this recipe)

If you have too much mixture for your pasties, bake it in oven for 15-20 minutes and it will make a lovely accompaniment for a meal

The pasties can be frozen when cooled and are equally delicious, whether served hot or cold

Chicken, Apricot & Almond Pie

The main ingredient that I was trying to use up this week was a packet of Filo pastry that had been in my freezer just a bit too long, after struggling to fold some rather flaky and dry sheets of Filo into a parcel shape, in my Wild Mushroom Parcel Recipe, I didn’t really want to attempt to make some planned chicken parcels.

I was at a loss of what to do with the remaining pastry but as I already had the chicken & apricot filling planned I thought that instead of making a parcel I would create a pie by topping the dish with crushed up filo pastry.

I had some dried apricots left over from a recent baking attempt and I know that apricot and chicken can work quite well together, hence the inspiration for the recipe that follows:

INGREDIENTS

  • 1 x tbsp. Olive Oil
  • 2 x Chicken Breasts diced
  • 1 x Onion finely chopped
  • 1 x Garlic Clove crushed
  • 3 x Dried Apricots finely chopped
  • 200ml Crème Fraiche/Cream
  • 200ml Chicken Stock
  • Dash White Wine (Optional)
  • 2 x Sheets Filo Pastry
  • Small handful of Flaked Almonds (Optional)

METHOD

Preheat oven to 180c (Fan)

Heat 1 tbsp.  Olive oil in a large frying pan over a medium heat

Add onion and garlic and cook for 3 minutes

Add chicken and cook for a further 5 minutes until browned

Add chopped apricots and cook for a further minute

Add dash of white wine if using (a dash of water or stock will do just fine if not, I used a couple of white wine ice cubes that I’d made previously from the remnants of a bottle of wine) and scrape the bottom of the pan to incorporate all the lovely flavours

Add stock and simmer until the liquid has reduced by half.

Finally add the cream, stir and season well. Continue to cook on the hob for 5-10 minutes, until sauce has thickened slightly

Meanwhile flake the two sheets of filo pastry, I did this by putting the sheets into a plastic freezer back and crushing with my hands

Remove the mixture from the heat and fill a greased pie-dish, top with the flaked filo pastry and for a bit of extra crunch sprinkle over a few flaked almonds

20140323-185222.jpg Sprinkle with milk or egg to ensure that the topping will turn a nice golden brown (I used a pastry brush and flicked it over the pie, you’ll find you’ll be unable to brush it as the flakes of pastry will stick to the brush)

Bake in oven for 15-20 minutes or until the topping of pie turns golden brown.

TIPS

Fresh Apricots would work well (if not better) I’d recommend just reducing the number as my pie was quite sweet.

The measurements of stock and cream are estimates, as a general rule, ensure all of the ingredients are just covered by the liquid.

If you add too much liquid, corn flour is a great way to thicken up a sauce.

If you don’t want to make a pie and are better at working with filo pastry than I am, you could make small individual parcels.

20140323-191126.jpg

Wild Mushroom Parcels

One of the ingredients I had to use up in this weeks batch cooking attempt was a packet of Filo pastry that had been festering in my freezer for a bit too long.

I generally find Filo pastry really difficult to work with and I also find that it doesn’t freeze very well despite the packet recommending that it’s perfectly fine to keep frozen for up to a month.

Searching through my cupboards and freezer I discovered that had some leftover dried porcini mushrooms, dried apricots, some chicken breasts and some flaked almonds. From these ingredients I decided two dishes that I could cook up were some Wild Mushroom Parcels and a Chicken, Apricot & Almond Pie (recipe to follow).

The only additional ingredients that I needed to buy to enable me to create both of these dishes were some cream (or I used Crème Fraiche), a packet of button mushrooms and an onion. And here is how I created the Filo Mushroom Parcels.

INGREDIENTS

  • 4 x Sheets Filo Pastry
  • 6 x Porcini Mushrooms (Soaked and Chopped)
  • 300g Button Mushrooms (Washed & Sliced)
  • 1 x Onion (Finely Chopped)
  • 200ml Crème Fraiche or Cream
  • 2 x Garlic Cloves (Crushed)
  • Dash of Stock or White wine (optional)
  • Knob of Butter
  • Parsley (Dried or Fresh)

METHOD

Soak Porcini mushrooms according to the packet instructions (save water for later).

Preheat oven to 180c

Heat butter over a medium heat in a saucepan; once melted, add the chopped onion and garlic and cook for 5 minutes or until the onions soften and become translucent.

Add in chopped button and Porcini mushrooms and continue to cook for a further five minutes.

Once mushrooms have started to soften, add in a dash of stock or white wine (I used frozen wine ice cubes that I’d made from left-over wine) and continue to cook the mushrooms over a low heat until the stock has reduced by half.

Add in 200ml cream (or Crème Fraiche) and some parsley, cook the mushroom mixture for a further 10-15 minutes, until the sauce has thickened and become a rich brown colour. For additional richness you can add in some of the water used to soak the Porcini mushrooms.

Season to taste before removing the mixture from heat and allowing to cool slightly.

Fold the Filo pastry into a triangular shape and place 2-3 tbsps (depending how big you want your parcels to be) of the mushroom mixture in the centre of the pastry.

20140318-212839.jpg

Fold the corners of the triangle into the centre to create a parcel and brush with milk or egg to seal.

Place the parcels in the pre-heated oven and cook for 15-20 mins until golden brown.

TIPS

You don’t have to use Porcini mushrooms if not available, normal mushrooms will do just fine.

Why not add some chilli flakes or bacon for additional flavour.

If you don’t have Filo pastry, the filling would also taste great with puff pastry or topped on a bruschetta with a sprinkle of Parmesan for some cheesy goodness.

The cooked parcels can be frozen and reheated at a later date.

As mentioned at the beginning of my post, I find Filo pastry incredibly difficult to work with and probably will refrain from buying it in future and I’ll definitely avoid freezing it.  Due to the crumbliness of the pastry I struggled to actually form a parcel so the finished product looked a bit misshapen. I certainly wouldn’t win any points on Masterchef for presentation, but the parcels tasted great and I managed to get rid of a couple of ingredients that had been lurking in my cupboards/freezer for a bit too long.

20140318-212905.jpg

Batch Cooking – Saving Time and Reducing Food Waste

I just don’t have time to cook a healthy home-cooked meal every night of the working week. With work commitments, a long commute and an attempt to keep up some sort of fitness regime /social life, it’s just not possible for me to cook every night if I want to sit down before the witching hour for dinner.

With a bit of organisation and time to set aside at the weekend, I think I’ve found the solution. I’ve found that by batch cooking a couple of dishes on a Sunday afternoon, I can save time during the week and come home to a gratifying and nutritious meal on week nights minus the late night cooking.

There’s no secret guide and nothing particularly demanding about batch cooking; all you need is a plan, a few hours and ideally some spare freezer space. The concept of batch cooking is that you cook multiple portions or multiple meals in one go and store for a later date. If you do some research, you’ll find that some people recommend planning a whole 30 days of meals in advance although I haven’t quite got to these extremes yet. Seven days of forward planning is enough for me in terms of batch cooking, however regardless of how many days meals you want to plan, the concept of batch cooking remains the same.

Pretty much anything can be batch cooked; I find items such as stews & casseroles, pasta dishes or curries and Asian dishes work great. You can cook these dishes in large quantities; they freeze well and can be reheated quickly.

I tend to cook two different dishes on a Sunday which will serve four meal times, sometimes all of these portions will get eaten during one week which means eating the same meal two nights in a row. Repetition doesn’t bother me, I’d rather have a repeat of something home-cooked, healthy and fulfilling than grabbing a ready-meal or take-away because I don’t have time to cook. There are other ways of mixing it up, for example if you’re having stir-fried chicken and veg, you could have it with rice one night and the following night, knock up a salad or serve up the leftover chicken with some potatoes for that bit of variety.

If you really can’t handle eating the same meal twice in one week, why not cook up more than two dishes at a time? If you cook up a number of dishes that incorporate some of the same ingredients, this will make batch cooking all the easier, for example if you need onion for three different dishes, cut all the onions up at once and so on. Going back to the chicken example, if you have the base ingredients of chicken and vegetables you can fry them up with a sauce to create a stir-fry and then save the additional portions of the plain chicken and veg and cook it up with some stock, potatoes and tinned tomatoes for a homely hearty casserole. By simply switching, two or three ingredients and varying the cooking style, you’ll find the same base ingredients can actually create really varied dishes.  There’s still no harm in creating double the portions of what you need for the week, as long as you have the freezer space to store the additional servings, you can keep the dishes for a number of weeks. You might even find that you manage to build up a nice stockpile of homemade ready meals and some weeks you won’t have to shop or cook at all.

I mentioned that there are some other quick wins, which just require a small change in habits. I’m sure you’ve all had veg that you bought in bulk and haven’t been able to use it up before it starts to go all wrinkly, or maybe you’ve cooked a bit too much mashed potato one night? Well the trick is to not chuck this stuff out but freeze it to be reused at a later date. Most fresh veg can be frozen; I tend to chop the veg up, pop in the freezer and it’s ready to thaw at a later date.  Some people recommend blanching or cooking veg first, I tend to find it depends on what the item is, the internet will give you the answers on the best methods for various vegetables. Learning how to freeze different items and what the best method is will come via and trial and error, I wrote a few tips that I’d discovered in my last blog post about the benefits of the humble freezer.

My advice is don’t be daunted about what some people deem to be batch cooking, start small and gradually change some of your daily habits, hopefully you’ll find that by investing in a few hours of batch cooking once a week, you’ll have much more time to spend with family, doing the things you enjoy in the evening as opposed to slaving over a hot stove.